
Course Map
The Golf Course
A brief introduction ...
The first hole, a generous right handed dogleg, heads north, setting up a spectacular combination of holes overlooking the lagoon (Lagoa de Óbidos). The feature hole of the front nine is the 3rd, a 144m Par 3 off the yellow tees to an island green, with the stunning Óbidos lagoon in the background.
The second nine holes overlook the Atlantic Ocean. Six of the holes meander between an intricate ecosystem of lakes interconnected by cascading streams. The highlight of the back nine is the 18th, a 490m Par 5 off the yellow tees, with a panoramic over the back nine, the clubhouse and the Ocean beyond.
The clubhouse offers a restaurant with a variety of menus available, two bars, lounge, pro-shop and bags storage area. Sitting out on the generous terrace, owners and visitors to Royal Óbidos will enjoy spectacular views of the golf course and the cascading lakes and streams, ”and some truly wonderful sunsets” over the Atlantic Ocean.
The Club house offers varied cuisine in The Legend Restaurant & Bar, two bars, a reception, a golf shop and a collection area. In a large terrace area, both owners and visitors enjoy a breathtaking view over the golf course, with the different lakes, streams and waterfalls, as well as a wonderful and unforgettable sunset, taking the sea as a backdrop.

Hole 1
A slight dog-leg to the right. Ideally, place the drive in the center of the fairway to the left, to open the green for the approach stroke. For the approach to the green choose one more club to compensate for the elevated green.
PAR: 4 | SI: 7

Hole 2
The fairway-accompanying lake has a strong role in playing this hole. Suggest a defensive strategy with a tee iron keeping the ball short of the lake, using three strokes to reach the green, because it is very well protected by water.
PAR: 5 | SI: 3

Hole 3
A short par 3, where the green is elevated in regards to the tee. This makes the club selection difficult but paramount, with the green surrounded by bunkers.
PAR: 3 | SI: 13

Hole 4
A challenging and demanding par 4. The drive should be positioned to the left of the center of the fairway in order to open the green for the approach stroke, which will certainly be with a medium / long iron or possibly a wood. You should always count on one more club to compensatefor the elevation of the green.
PAR: 4 | SI: 1

Hole 5
A good drive is vital to a good result in this hole. The drive should be hit slightly to the right of the bunker. The most experienced player now has the option of attacking the green in two.
PAR: 5 | SI: 9

Hole 6
A short par 3 where the club selection is key for a good result. Any shot short of the green will invariably find the lake. In contrast, a long shot will result in a very difficult chip onto a descending green.
PAR: 3 | SI: 15

Hole 7
A slight dog-leg left. It is vital to find the fairway with the first two strokes so as to facilitate the approach stroke to the raised green and with a strategically positioned bunker waiting for any slightly longer shots.
PAR: 5 | SI: 5

Hole 8
A beautiful par 3 with the Berlengas and Farilhões Islands as a backdrop. The choice of the right iron is paramount in view of the difference in elevation between the tee and the green and the predominant wind on the right side of the Ocean. A green with a bunker to the right and back.
PAR: 3 | SI: 17

Hole 9
An easy par 4 facing the clubhouse, relatively short. The drive should be played slightly to the left of the center of the fairway in order to facilitate the approach stroke, mostly done with a medium or short iron to an elevated green.
PAR: 4 | SI: 11

Hole 10
A very challenging hole to start the back nine. Two good strokes are needed to reach the green. The drive should be positioned to the left of the center of the fairway. The second stroke will be with a long iron or a wood to the right of the center of the green.
PAR: 4 | SI: 8

Hole 11
The drive should be played in the middle of the fairway between the bunkers. More experienced players can choose to attack the green with the second shot. For the more conservative player, a lay-up would be the right choice.
PAR: 5 | SI: 10

Hole 12
A challenging par 4 where good strategy is key. The drive must be accurately played to the center left of the fairway, as the lake comes into play on the right. The approach stroke to the green will be with a long iron or a wood.
PAR: 4 | SI: 2

Hole 13
A short par 3, where the green is elevated in regards to the tee. This makes the club selection difficult but paramount, with the green surrounded by bunkers.
PAR: 3 | SI: 18

Hole 14
This par 4 will be conquered or not depending on the approach stroke, as the tee shot is relatively easy onto a generous fairway. The second stroke is very challenging and over water.
PAR: 4 | SI: 6

Hole 15
This captivating par 3 can make or break the player's round. With an elevated tee and a green surrounded by water. Club selection is paramount.
PAR: 3 | SI: 14

Hole 16
This inviting par 4 plays longer than it looks. Keep the drive to the right of the fairway bunker for better positioning. It will leave you with a short approach to the green.
PAR: 4 | SI: 16
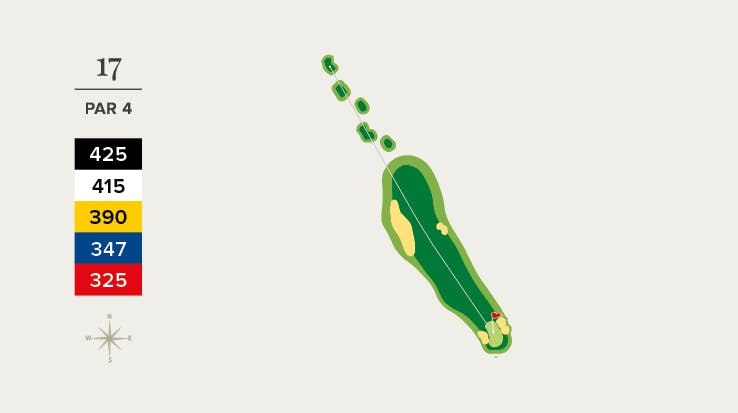
Hole 17
Hole 17 can tempt any player to go for a long drive as the fairway looks seductively wide, but the reality is not always as it looks. The key to a good result here is to play to the center of the fairway. A ball that stays in the rough makes it difficult to reach the green, due to the length of the hole.
PAR: 4 | SI: 12

Hole 18
A good drive is vital to a good result on this hole. The drive should be hit slightly to the right of the bunker. The most experienced player now has the option of attacking the green in two.
PAR: 5 | SI: 4